NIC for FLIR 10Ge
Step-by-step to configure a FLIR 10Gb camera with an Intel Network adapter:
Prerequisites:
64GB memory
Cat 6A cable
Intel X550T2 ETHERNET CONVERGED Network Adapter X550-T2 (available from Sorcium as Part#: 3E9073)
Warning
The same procedure works also for the latest FLIR supported Myricom ARC Series C-Class network adapter
Tasks:
Enable jumbo packet
Disable DHCP and set a fixed IP address on the Ethernet port connecting to the FLIR
Increase the receive buffer size.
Increase the Network parameters in the kernel
Set the NIC tx queue length
Description:
and 3. are documented at here
4. is documented both at flir doc and in the areadetector doc
edit /etc/sysctl.conf and add:
net.core.rmem_default=26214400
net.core.rmem_max=268435456
edit /etc/rc.local and add:
/usr/sbin/ifconfig ens1f1 txqueuelen 3000
Warning
NIC camera settings and 10GB nic settings in this example the camera is attached to ens1f1
Set the NIC as follows:
eth0: flags=4163<UP,BROADCAST,RUNNING,MULTICAST>  mtu 9000
    inet 169.254.100.68  netmask 255.255.255.0  broadcast 169.254.100.255
    inet6 fe80::260:ddff:fe42:4e2  prefixlen 64  scopeid 0x20<link>
    ether 00:60:dd:42:04:e2  txqueuelen 1000  (Ethernet)
    RX packets 248  bytes 86800 (84.7 KiB)
    RX errors 0  dropped 0  overruns 0  frame 0
    TX packets 282  bytes 26319 (25.7 KiB)
    TX errors 0  dropped 0 overruns 0  carrier 0  collisions 0


eth1: flags=4163<UP,BROADCAST,RUNNING,MULTICAST>  mtu 9000
    inet 169.254.0.65  netmask 255.255.255.0  broadcast 169.254.0.255
    inet6 fe80::260:ddff:fe42:4e3  prefixlen 64  scopeid 0x20<link>
    ether 00:60:dd:42:04:e3  txqueuelen 1000  (Ethernet)
    RX packets 1273  bytes 445550 (435.1 KiB)
    RX errors 0  dropped 0  overruns 0  frame 0
    TX packets 281  bytes 26249 (25.6 KiB)
    TX errors 0  dropped 0 overruns 0  carrier 0  collisions 0
After the above tasks are completed we need to configure the camera with a static IP address in the same NIC subnet. To accomplish this task install and run SpinView from FLIR and connect the camera to the same subnet the computer running spinview is connected to, then:
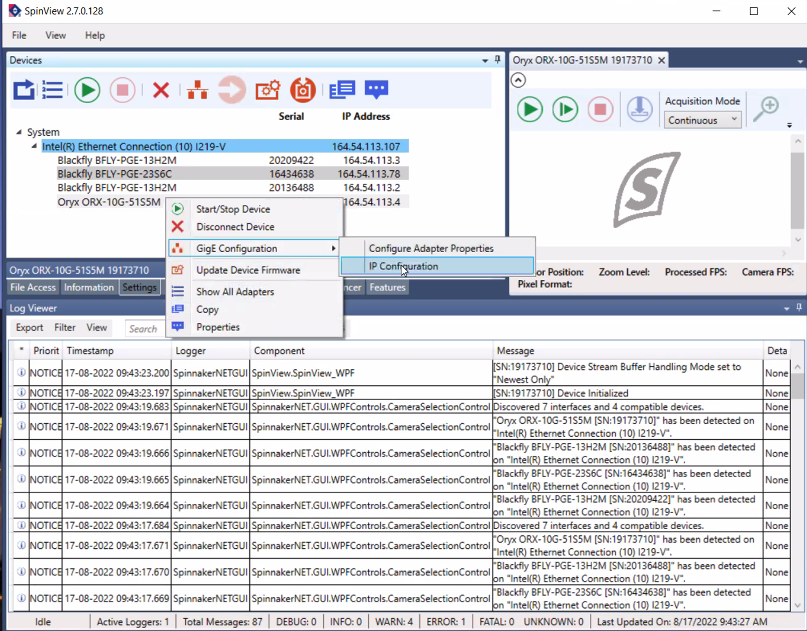
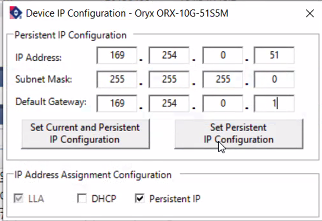
Warning
After the above configuration is completed power cycle the camera to implement the IP address changes.
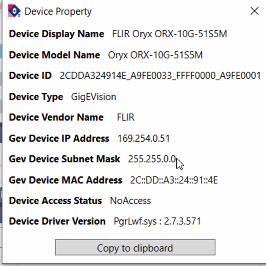
Reconnect the camera to the NIC on the AreaDetector controller computer an ping to its IP address to confirm the connectivity. The configuration is now complete.